Ever wanted to create your own, individual cryptocurrency?
Read on, if you reach the end of this post and have followed all instructions in the hands-on guide, you will have created your own working cryptocurrency in less than 20 mins.
How’s that?
The magic-happens-here part is done by the revolutionary technology named Ethereum or Ethereum Virtual Machine (EVM).
What is it?
Summarizing this great explanation: “blockchains are peer-to-peer cloud computers that collectively enforce a set of rules on a historical record that they create together. Bitcoin’s rules define a currency: how are new tokens produced, how many are allowed, how they can be transferred from one person to another, etc.
Ethereum’s rules define a process for defining new rules.”
Feeling a little “meta” here? For sure. Let’s try another definition:
“If you think of Bitcoin as a decentralized version of Microsoft Excel, then Ethereum is a decentralized Excel where we’ve made the visual basic macros functional, […] with the Bitcoin blockchain, each cell on this hypothetical Excel table holds just a number; on the Ethereum blockchain, each cell is home to an entire computer program.”
Before reading on, make sure that you understand this new dimension Ethereum adds to existing blockchain technology.
Your Bitcoins are static data blobs (yes, we are oversimplifying here, Bitcoins can be scripted. But nobody does.)
Your Ethereum contract can be a static data blob as well. However, it might as well be a condition checking for the release of your home’s lock after you paid your rent or Skynet trying to take over the world.
In essence, the new dimension of Ethereum consists in each “coin” being a turing complete computer program running in a peer to peer cloud.
Not excited by now? Ok, let’s take another perspective.
Even if you don’t hack a new facebook or google at night, you should be able to read and understand this program
contract token {
mapping (address => uint) public balanceOf; // [1]
function token(uint supply) { // [2]
if (supply == 0) supply = 10000;
balanceOf[msg.sender] = supply;
}
function send(address receiver, uint amount) { // [3]
if (balanceOf[msg.sender] < amount) return;
balanceOf[msg.sender] -= amount;
balanceOf[receiver] += amount;
}
}
with a little help by this walk-through:
[1] We are assigning an address to an “amount” (in many languages a dictionary, in Java a Map, you name it. A simple Key/Value Store)
[2] A constructor (in many (OO-)languages a initializer for the new object). Here this initializer is called once during the whole lifecycle of a smart contract: when the contract is written in the ledger (deployed). msg.sender is the address of the creator of the contract. He gets all the money.
[3] A very simple function which makes sure that the storage status can be changed, otherwise the programm would be completely static. Changing the storage status means transfering/sending amounts from one key (address) of the dictionary to another key.
So, here we are. Maybe you got it already, this is your own, individual cryptocoin. It starts with an amount of 10000 “items” which can be subdivided and sent to other addresses. This is exactly the minimum functionality of a cryptocoin.
Before you go on, try hard to understand what happens here – we are facilitating the properties of a cryptocurrency blockchain (cryptography, consensus algorithms, peer to peer technology), everything eg. the Bitcoin blockchain has, for our own rules. These rules are just transfering a value from one address to another and storing the result. That’s exactly as usual cryptocurrencies do.
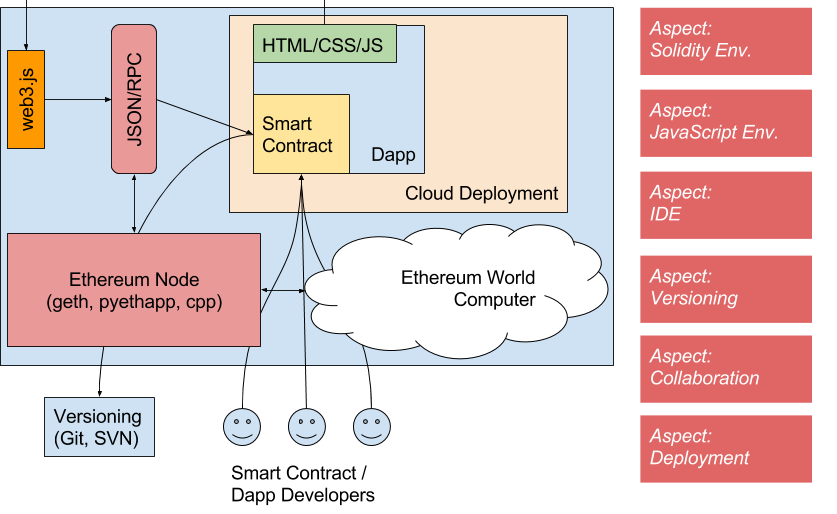
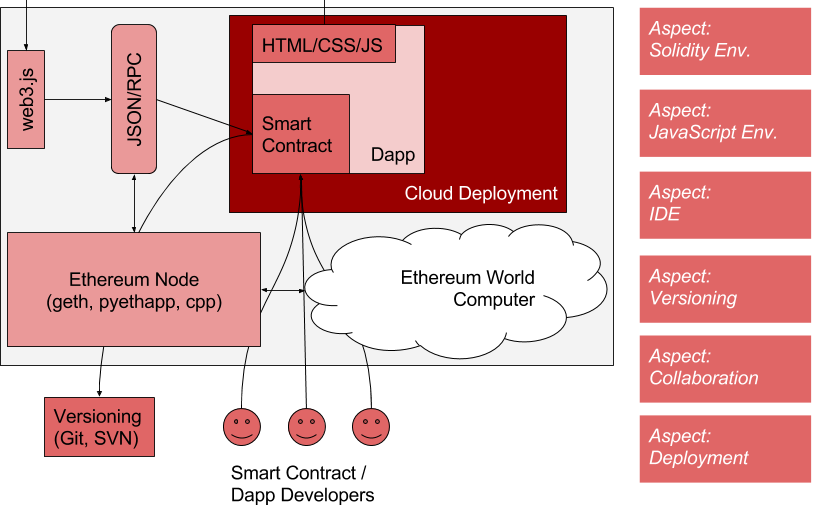
Our cryptocurrency is one app (also called dapp for decentralized app) inside the Ethereum blockchain. See it as one really smart Bitcoin simulating the whole Bitcoin system itself (we are going meta again).
Ok, enough head spinning, let’s try this out.
Hands-on Guide to your own Cryptocurrency
One word of warning: after this tutorial, you will have your running smart contract in the (local, private) Ethereum chain, but you will most certainly not have understood how this is working.
To understand the principles and technologies behind Ethereum, I strongly advise visiting these sites:
- The Ethereum Main site: your entry point to Ethereum
- The Ethereum Frontier Guide Gitbook
- The Ethereum Builder’s Guide Gitbook
- A 101 Noob Intro to Programming Smart Contracts on Ethereum
- (Hands-on) How to create a Private Ethereum Chain
This tutorial mainly is just a very compressed rewrite of those sites.
Ok, to be clear about the 20 minutes: reset your stopwatch now, we are counting the time from now on.
What’s the tutorial about?
- Creating a local, private Ethereum chain
- Setting the stage
- Deploying our cryptocurrency in cosmo.to
Creating a local, private Ethereum Chain
We will start with installing Geth, the Go implementation of the Ethereum protocol. We chose Geth because it runs in Linux as well as Windows without having to install any dependencies before and with a dead easy installation procedure. (Might be a good point for Golang)
All instructions are in the Ethereum Guide, however the Windows link is wrong currently, use this one.
Now, here’s the important part missing in the main guide for using specific Ethereum chains:
A Ethereum chain is defined by two factors, which are unique to each chain: the network id and the genesis block. The genesis block is the big bang of your own Ethereum universe and the values there are the cosmological constants of your universe. If you want to participate in a specific Ethereum chain, you will have to
- have a network connection to a running node
- know and use the network id (given as command line parameter)
- use the identical genesis block
Our genesis block looks like this, save this as genesis.json to some directory. All parameters are explained in detail here.
{
    "nonce": "0xdeadbeefdeadbeef",
    "timestamp": "0x0",
    "parentHash": "0x0000000000000000000000000000000000000000000000000000000000000000",
    "extraData": "0x0",
    "gasLimit": "0x8000000",
    "difficulty": "0x400",
    "mixhash": "0x0000000000000000000000000000000000000000000000000000000000000000",
    "coinbase": "0x3333333333333333333333333333333333333333",
    "alloc": {
    }
}
Now, if you start Geth with these parameters
geth --genesis genesis.json --datadir somedatadir --networkid 23 --rpc --rpcaddr="localhost" --rpcport="8080" --rpccorsdomain="*" --maxpeers=1 console
the most important part is already done. With genesis.json and network id 23 your chain is defined and whoever wants to play with it has to agree on the genesis and the network id. Or she could just start her own universe with different cosmological constants, just like in real life. If you believe in multiverse theory. And in real life.
Setting the stage
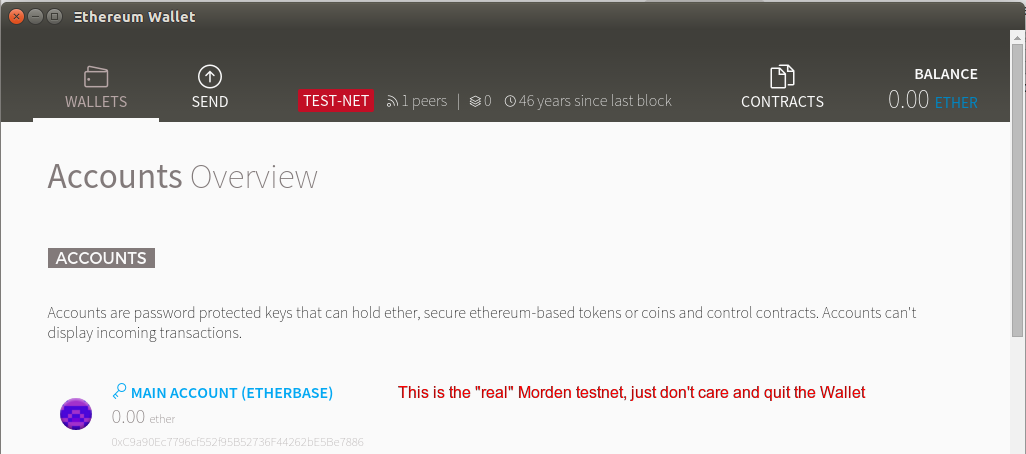
Actually, the node we started above does not do much, it just sits around and does not mine Ether. Therefore, our universe has no “time”, it is static. We have to create a primary, “etherbase” account, to facilitate mining which we need for deploying our contract.
We are in the console now, just type
personal.newAccount()
you will get back a address like ‘0x693309002d4fbb672c90df7063b75b42055f5449’, which is your primary account address. Do it a second time to have another account. You will feel lonely otherwise transfering your new currency between you and you.
Now exit the console and restart with
geth --genesis genesis.json --datadir somedatadir --networkid 23 --rpc --rpcaddr="localhost" --unlock="0x693309002d4fbb672c90df7063b75b42055f5449" --rpcport="8080" --rpccorsdomain="*" --maxpeers=0 --mine
At startup, you will be asked for the password, just type it in, even if the console is moving, your keystrokes will be recognized.
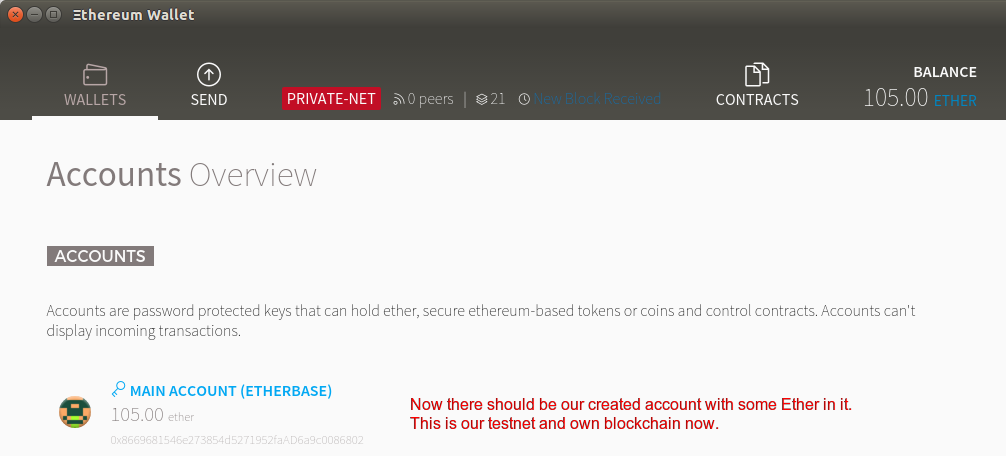
This time, our universe is ticking. We can go on.
Deploying our cryptocurrency in cosmo.to
Right now our operating system is running, but using it as a developer is quite complicated. You have to compile your contract to bytecode first, using a compiler like solc and afterwards have to deploy the contract.
Of course, using it is also not the most intuitive thing. Remember the first days of the internet, of Java Applets, mobile application development on Android – there you are.
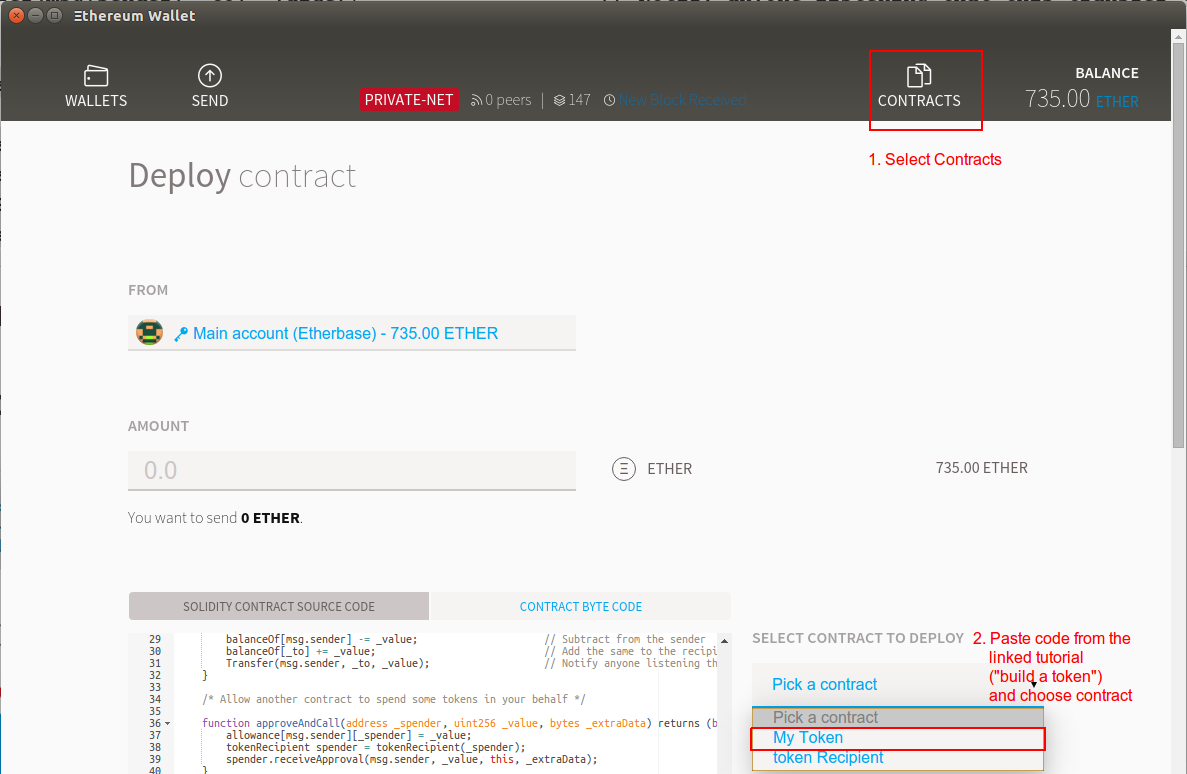
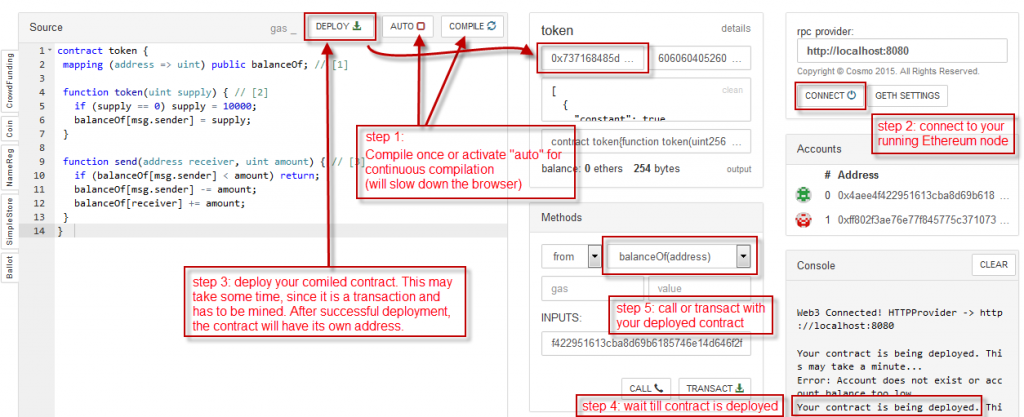
However, for this early stage in the history of the “internet of value” there exist quite a lot tools which ease development, one (to me the most stunning) projects is cosmo.to
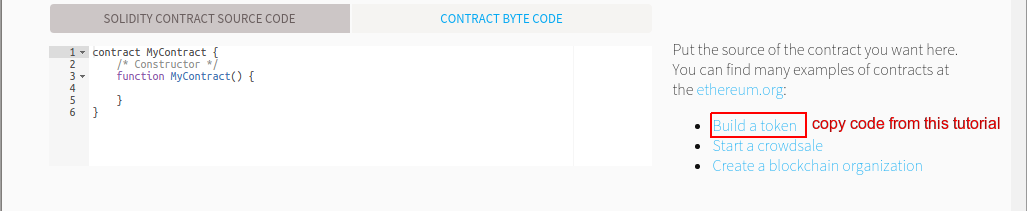
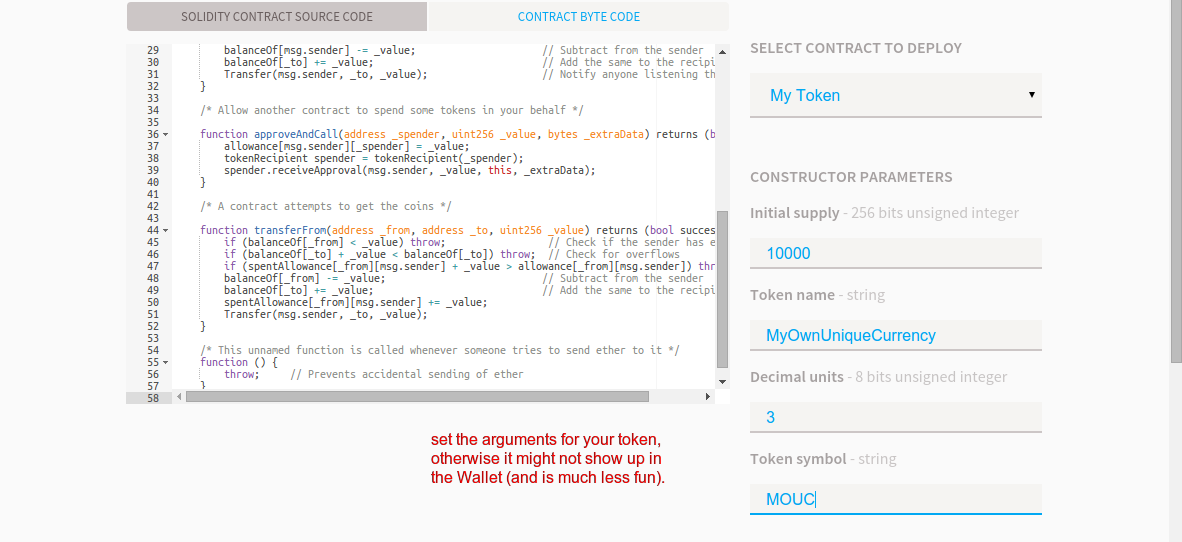
It is based on the solidity browser, but adds a lot of usibility, try it yourself. Open cosmo and follow the notes in the attached screenshot.
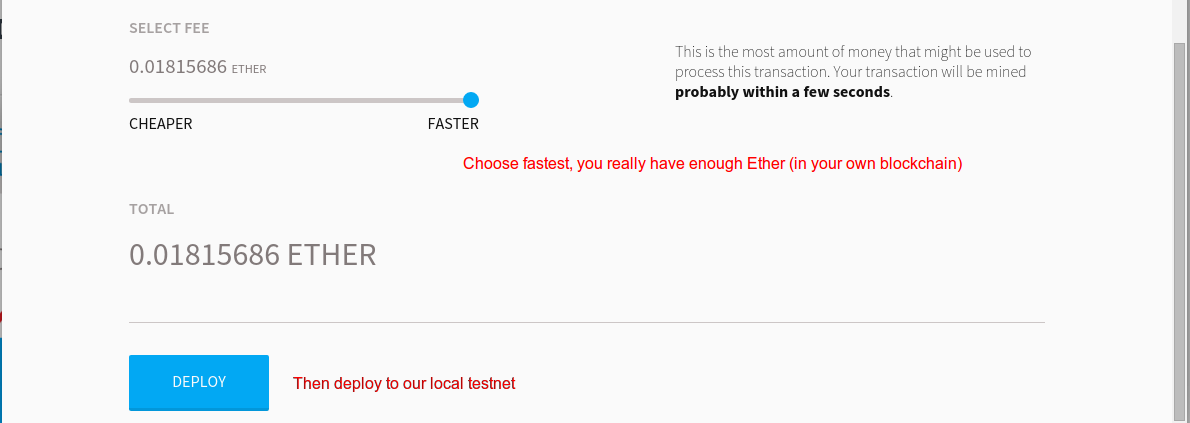
Choose “auto” compile, copy the sample token source code from above and deploy it. The last step is crucial, since this makes our application usable. It is like running your executable or, in more modern terms, deploying your application to Bluemix, Amazon AWS, the Google Cloud, whatever. But your application has guaranteed 100% availability, and noone can shut it down. If you deploy it to the real Ether chain that is.
For our local Ethereum chain, your contract has now been mined (by yourself) and added to the ledger.
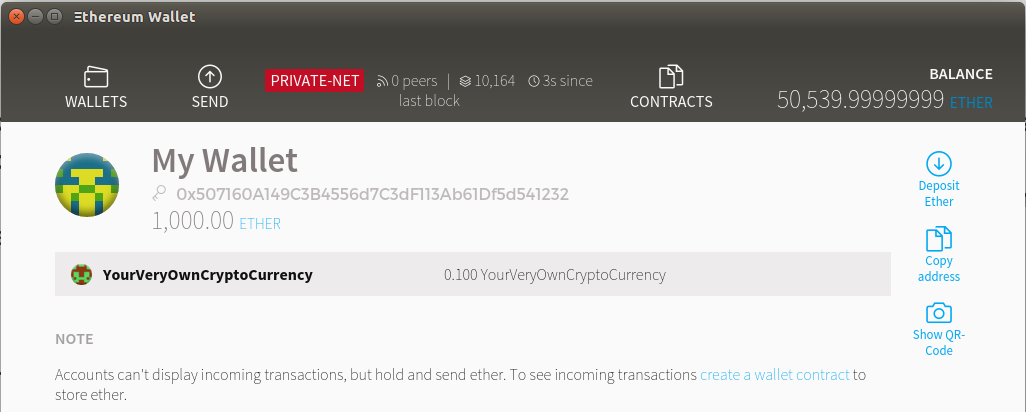
Congratulations! The logic can now be executed and cosmo helps you a lot in using it. Use “call” to query the state and “transact” to change the state. Send your new currency to your 2nd account. You will have to wait some time (depending on the speed of your somputer) till the transaction is executed, so don’t wonder if the call does not succeed for some time.
Now play around. Do you get it? Create new accounts, send your token/coins around. This really is a value-exchange (even a currency) if you want to and the others, who are using your contract, agree with you.
They do not have to trust you at all, anybody can easily deduct that the initial amount of your coins is fixed at 10000 and cannot be extended. This is written in the contract and really nobody can change this, as nobody can change the Bitcoin ledger.
When people will really understand this trustless system, which can now not only transfer static value, but also run any application you can think of, we are sure that great things will emerge. And now you can be part of the universal Dapp system development. Have fun!
![[casino kurhaus*]](http://blockchainers.org/wp-content/uploads/2016/06/16135779895_fdea2ef33c_z-e1465673411204.jpg)
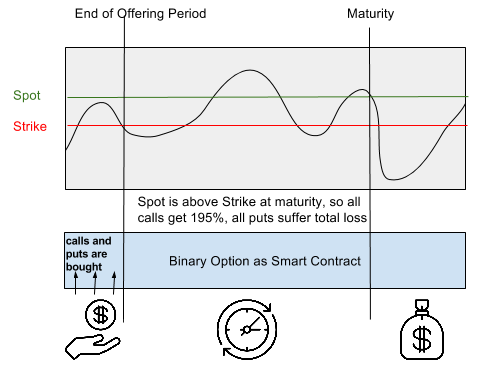 So, in contrast to common regulated financial products we have a really comprehensible option, which is mostly valued as high-risk, because there is a real clash of interests if the broker also evaluates the stock against the strike price and thus is highly motivated to manipulate this evaluation.
![[oracle*]](http://blockchainers.org/wp-content/uploads/2016/06/5822220225_0af0d40df4_m.jpg)
 Here the two problems are addressed: