Brief introduction to ENS

Brief introduction to ENS (Ethereum Name Services)

An Internet without Domain Name Service (DNS) is hardly imaginable. Addressing resources directly on the basis of their IP address would be a difficult and an error-prone undertaking. How nice it is that there is a Domain Name Service (DNS) that makes the mapping between machine-readable IP addresses and easily understandable memorable names for humans. With the help of DNS, we can easily locate resources on the Internet, even if their IP addresses have changed in background.

A similar function as DNS on the Internet, is ENS on the Ethereum blockchain. Resources of the Ethereum blockchain are primarily Smart Contracts. Contracts are addressed via a 20 byte address, represented as a 40-digit hex string.

The core elements of the Ethereum Name Service are specified in EIP-137. These are the core elements:

  •  ENS-Registry
  •  Resolvers
  •  Registrars

The ENS Registry is a contract that is responsible for the administration of domain names. In addition to mapping domain names to a linked resolver contract, the registry is responsible for ensuring that the owner of a domain has the permission to set up new sub-domains for this domain or to change entries in the resolver.

Revolvers are responsible for responding to resource requests to a domain and return, for example, the contract address, the ABI of a contract or the publickey of a wallet. Each domain name has a link to its resolver.

The registrar is the owner of a domain. Only the registrar has the right to register new sub-donains or change resources. Registrars are contracts or owned accounts. Top- and second-level donains are usually managed by a registrar contract. For example, the second-level domain of Mainnet is administered by a registrar which implements an auction procedure for the allocation of new domains.

Analogous to DNS, the namespace is hierarchically subdivided. Individual domains are separated by dots. The DNS structure of top-level, second-level and sub-domains has been adopted. A valid domain name is, for example, ‘earth.planets.eth’. Domain names are mapped to sha3-hashs (keccak_256). The derivation of the hash is defined by the following namehash function:

def namehash(name):
  if name == '':
    return '\0' * 32
  else:
    label, _, remainder = name.partition('.')
    return sha3(namehash(remainder) + sha3(label)) 

The hash of ‘earth.planets.eth’ is calculated as follows:

sha3(sha3('eth') + sha3(sha3('planets') + sha3('0x0000000000000000000000000000000000000000000000000000000000000000' + sha3('earth'))))

Reverse Name Resolution

In addition to mapping a domain name to its resources such as address, ABI or publickey, ENS also supports reverse mapping from an address to its domain name. The procedure for this is described in EIP-160. For reverse mapping, the resource address is registered under the reverse domain name ‘address’.addr.reverse. The resolver for the reverse domain name holds the name of the original domain. The registrar of the domain ‘addr.reverse’ provides a function setName(‘domain’) under which a caller registers his domain-name.

Example

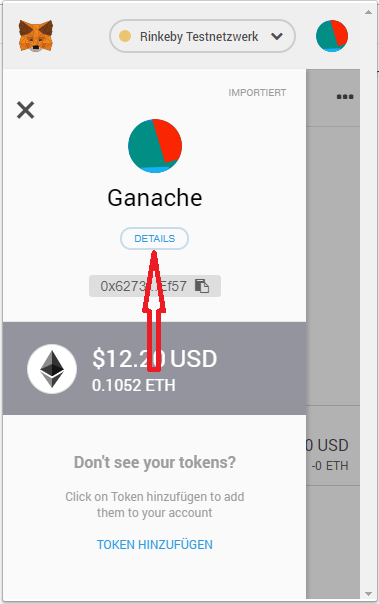
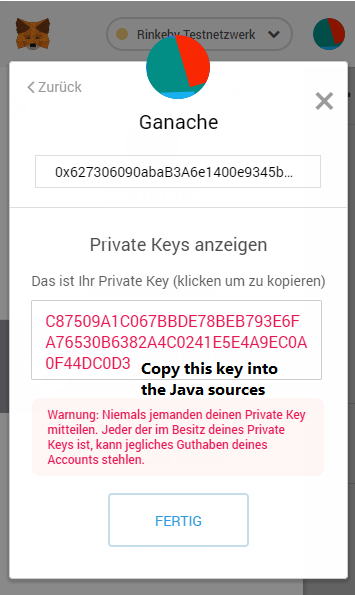
The following example shows how to install ENS including a registrar for reverse name resolution. Deploying all contracts requires a working truffle environment and access to an Ethereum node such as Ganache. You find the project repository at GitHub: Ehereum-ENS-Demo

Step 1: Contract Deployment

In the first step all required contracts are deployed. The script ‘2_deploy_ENS.js’ deploys the ENS-Registry (ENS.sol), the registrar for the top-level domain (FIFSRegistrar.sol), the registrar (ReverseRegistrar.sol) for the reverse domain, the resolver (PublicResolver.sol) for answering resource requests. Finally, the domains ‘planets.eth’ and ‘addr.reverse’ are registered.

The script ‘3_deploy_Planets.js’ deploys a demo contract and registers it under the name ‘earth.planets.eth’ and its addresses in the domain ‘addr.reverse’ with the name ‘earth.planets.eth’. The contract ABI is also packed in zlib format and assigned to the domain as a resource.

The entire deployment is started with the command:

truffle migrate --reset

Step 2: Access earth.planets.eth

The command

npm install

installs all necessary libraries. The libraries ethereum-ens and web3 are used for easy access to ENS and resources of a domain. Before start, the address of the ENS registry must be added to the script (see const ensAddr).

The script is started with the command `node scripts\call_Earth.v1.js`. First the script determines the address and ABI of the domain name ‘earth.planet.eth’, then creates a client for contract access. In the second step, the domain name stored for the address is determined and printed.

The library “ethereum-ens” simplifies the access to the ENS registry. Alternatively, the script ‘scripts\call_Earth.v2.js script’ shows access to the ENS registry without using “ethereum-ens”. The script is started with:

truffle exec scripts\call_Earth.v2.js

More Ressources

invite_me: Onboarding to Ethereum chains with keybase.io identity verification and EIP-712

This is not a Blockchain-bullshit-only post. Head to https://github.com/ice09/onboarding-eip712 for a sample implementation of a private Testnet onboarding with Twitter, Reddit or Github Keybase proofs.

The challenge…

Creating a private Ethereum Proof-of-Authority testnet is actually quite easy, just follow the instructions of Parity or, for testing purposes only, cliquebait, and you’re done.

But how do you onboard new users, who want to participate in your testnet, if they don’t have any ETH to start with and you still want to stay as close to your production environment in terms of gas usage as possible and therefore don’t want to enable gasless transactions in your PoA testnet?

…and the public testnet solutions

Kovan PoA

The public (Parity-powered) Kovan PoA solves this problem by providing a “Faucet Service” which is verified by

Rinkeby PoA

The public (Geth-powered) Rinkeby PoA solves this problem by providing a “Faucet Service” which is verified by

However, these methods require trust or establish dependencies on the testnet providers, which you will and can most likely not introduce in your private net. 

Analysing the problem

There are (at least) two different user states which a user can have in your PoA private testnet:

  1. The user has an authorized account in one of the authority node wallets.
  2. The user is connected to the private testnet, but initially has no balance.

In Proof-of-Work (PoW), the non-authorized user could start mining and get ETH for contract development. This is the Ropsten solution. In PoA, mining is not possible, so the user has no possibility to transact on the chain, except for using usd_per_tx=0 or similar for no gas costs on the authority nodes, which is possible, but contradicts the security measures established by having gas usage for transactions to minimize code execution, prevent infinite loops, etc. Even more, the setup on a test stage should always be similar to the production environment.

Recentralizing for “Almost Know Your Customer”

keybase.io does a great job in identifying users without revealing their real life identity if they don’t want to. But they make it quite difficult for attackers to create several identities. So a good enough solution for onboarding otherwise unknown users could be to bind their testnet accounts to their keybase users.

The basic idea and the following approach is inspired by Aragon and one of their great blog posts, which every Ethereum/Solidity dev should take a look at.

In our setup, we changed two crucial factors:

  1. removed dependencies on a product (Aragon) and on the Oracle (oraclize.it) and
  2. introduced a middleware component as a new dependency, but which you control and can (and have to) host on your own server.

keybase allows for publishing files per HTTPS by copying them to KBFS file system. Thereby, someone reading a file from https://KEYBASE_USER.keybase.pub/invite_me.json can be sure that the file invite_me.json was stored by keybase KEYBASE_USER.

But this is just one proof, how can we be sure that the user really has the private key for the address he wants to be registered? We can just sign the message with the private key and ecrecover in a contract. 

Using this mechanism, we can be sure that:

  1. If the URL https://KEYBASE_USER.keybase.pub/invite_me.json gives back the correct JSON, the user is who he pretends to be, since he had to copy invite_me.json to KBFS
  2. The address (private key) belongs to the user, since he signed the message in invite_me.json and the signature is ecrecovered in the invite_me contract.

MetaMask does a great job in helping signing data with your Ethereum’s account private key. However, up to EIP-712 the signed data has been displayed as a non-human-readable Hex string.

This is unacceptable, especially in crypto, a field of very easy and unavoidable fraud attempts. 

Therefore, we are supporting EIP-712 by signing with a MetaMask version supporting the new eth_signTypedData method. EIP-712 is a major step forward and should be the only way users are required to sign data with their Ethereum account’s private key.

The following overview shows the process which let a new user register his keybase user to a new generated address. Afterwards, 10 ETH are sent to this address. The user can only register once. However, the contract owner can manually unregister users if necessary.

For the ETH transfer to happen, the user must

  • have the invite_me.json as generated by the frontend part stored in his KBFS public directory, so that it can be retrieved by the server side process at the keybase.pub domain
  • have at least one of these Keybase proofs: Twitter OR Github OR Reddit

Introducing invite_me

The complete process is implemented in the “DApp” invite_me, which consists of a JavaScript frontend and a web3j-powered Java backend component called verifier.

After completing the steps, you can see the 10 ETH loaded into your account in MetaMask.

Let me try this!

First, checkout this. Then, make sure that you have an understanding how the authorization and verification works and what the Java component verifier does and how they depend on each other.

Last, install it locally and try it out. And, most importantly, please comment here or in the reddit post if it doesn’t work for you or if you have remarks about the approach, obviously this is work in progress.

What comes next?

We’d like to try two different approaches:

  • Using 3box as a more decentralized (but not as mature) keybase alternative
  • Realizing a different use case: “Almost KYC Airdrops” 

Excel2Blockchain with web3j

If you ever come to the conclusion, for whatever reason, that pushing Excel data to the Blockchain is what you need, we are happy to help!

We recently read about the Azure Blockchain Development Kit and had to cringe about the samples. But, who are we to judge those important enterprise business use cases requiring to get data from Excel to the Blockchain? 

Therefore, we took a look at the prerequisites, setup, initialisations and finally the execution of this with the new Microsoft Azure templates. And, to be clear, we love the idea of Microsoft getting involved into Blockchains and Ethereum and pushing Azure as a starter kit, that’s really great.

However, the whole procedure seemed quite long and exhaustive, that’s why we want to show how easy this is with standard development methods. Of course, these are lacking a lot of features and cool stuff you get with Azure then. But, they can help you to understand better what happens under the hood. So, let’s go for it.

No, wait, Excel to Blockchain, honestly? Why?

//TODO: Insert suitable reason here.

Ok then, but how?

Due to web3j it is really easy to connect to an arbitrary Ethereum Node, even Infura and Ganache, as simple as it is with web3.js or web3.py. All the other stuff is common Java dev tools, like Glueing with Maven, Excelling with Apache POI, etc. This is where Java shines, it’s really good at enterprisey integration stuff.

You can start directly and import the sources as a Maven project in your IDE or build it without an IDE and start it from the command line. See the details here.

Show me some code!

private void connectToBlockchain() throws IOException {
Web3j httpWeb3 = Web3j.build(new HttpService("http://localhost:8545"));
log.info("Connected to HTTP/JSON Ethereum client version: " + httpWeb3.web3ClientVersion().send().getWeb3ClientVersion());
// Create credentials from private key.
// Don't use with real (Mainnet) Ethereum accounts.
String privateKeyDeployer = "c87509a1c067bbde78beb793e6fa76530b6382a4c0241e5e4a9ec0a0f44dc0d3";
Credentials credIdentity = Credentials.create(pkDeployer);
BigInteger balance = httpWeb3.ethGetBalance(credIdentity.getAddress(), DefaultBlockParameterName.LATEST).send().getBalance();
log.info("Deployer address " + credIdentity.getAddress() + " has " + balance + " wei.");
}

private void deployExcelContractToBlockchain() throws Exception {
ExcelStorage excelStorageContractHttp = ExcelStorage.deploy(httpWeb3, credIdentity, ManagedTransaction.GAS_PRICE, Contract.GAS_LIMIT).send();
log.info("Deployed contract at " + excelStorageContractHttp.getContractAddress());
}

As you can see, ExcelStorage is a class which can used like any other Java class. It has been generated by a Maven plugin (web3j-maven-plugin) during build time. It is statically typed with methods resembling the Solidity functions of the smart contract and with all the nice aspects this has: compile time checks instead of runtime checks and brilliant IDE support (code completion, type checking, static code analysis).

With great IDE and build tool support, you can try this out yourself, you will be surprised how lightweight and easy Ethereum smart contract usage is from Java. Even more, integration with your existing (“legacy”) software and infrastructure is straightforward. 

Have fun!

Addendum: This is a Testsetup only! What about the real Blockchain?

Where does the private key in the current Java sources come from? 
If you start Ganache with the mnemonic mentioned, everytime the same accounts are generated. The first one being 0x627306090abaB3A6e1400e9345bC60c78a8BEf57. This address has one private key which is set into the Java sources to create the Credentials for contract deployment and transactions.

Setup for other test chains

  • Create an account with infura.io
  • Use the Endpoint URL from the dashboard and copy in into the Java sources

  • Create an account with MetaMask
  • Copy the address of your account

  • Copy the private key to the Java source code to use the account for contract deployment and transactions